Have you ever wondered why your Windows 10 computer takes ages to boot up or why your applications seem to load forever? The answer might lie in your storage device. If you’re still using a traditional hard drive, it’s time to consider migrating your operating system (OS) to a solid-state drive (SSD). In this comprehensive guide, we will guide you to migrate OS to SSD Windows 10, unlocking a whole new level of performance and speed for your computer.
Why migrate OS to SSD?
Moving Windows 10 to SSD offers a myriad of benefits that can significantly improve your computing experience. Let’s explore some of the key advantages:
- Faster boot times
One of the most noticeable benefits of an SSD is the lightning-fast boot times it provides. Unlike traditional hard drives, which rely on mechanical components, SSDs utilize flash memory technology, allowing for near-instantaneous startup. With an SSD as your primary storage device, you can say goodbye to those lengthy coffee breaks while waiting for your computer to start.
- Improved overall system performance
SSDs offer superior performance compared to traditional hard drives. They provide faster read and write speeds, resulting in snappier system responsiveness. Whether you’re launching applications, browsing the web, or performing data-intensive tasks, an SSD will ensure a smoother and more efficient experience.
- Enhanced multitasking capabilities
SSDs excel in handling multiple tasks simultaneously. With their fast data access and transfer speeds, you can seamlessly switch between applications and work with resource-intensive software without experiencing performance blocks. Whether you’re editing videos, running virtual machines, or handling complex spreadsheets, an SSD will keep up with your demands.
What needs to be prepared for the migration process
Before diving into the migration process, it’s essential to make a few preparations to ensure a smooth transition. Here’s what you need to do:
- Backup important data
Whenever you undertake a significant change to your system, it’s crucial to back up your important data. While the migration process itself shouldn’t cause data loss, it’s better to be safe than sorry. Create a backup of your files, documents, and any other data you can’t afford to lose.
- Check SSD compatibility
Before purchasing an SSD, ensure it is compatible with your computer. Check the manufacturer’s specifications or consult your computer’s documentation to verify the supported interface (e.g., SATA or NVMe) and form factor (e.g., 2.5-inch or M.2). This will help you choose the right SSD for your system.
- Gather necessary tools and software
To migrate your OS to an SSD, you’ll need the following tools and software:
A screwdriver (if installing an internal SSD)
An external SSD enclosure (if using an external SSD)
A free disk cloning software tool (such as AOMEI Back upper or AOMEI Partition Assistant Professional)
A USB flash drive or external hard drive (if required by the cloning software)
What’s the Best SSD Cloning Software for Windows 10/11?
If you’re seeking a reliable solution to migrate Windows 10 from HDD to SSD or clone your Windows 10 system to an SSD without reinstalling, AOMEI Partition Assistant Professional is your ideal choice. While there are other options available, AOMEI stands out as a top-notch disk format tool.
With AOMEI cloning software, you can effortlessly handle the entire cloning process for various scenarios, including:
Mismatched SSD capacity: Whether the SSD is smaller or larger than the HDD, AOMEI Partition Assistant handles it flawlessly.
SSD 4K alignment: Rest assured that your SSD’s performance won’t be compromised, as this software ensures proper 4K alignment.
Versatile functionality: Beyond cloning, AOMEI Partition Assistant offers a range of practical features, such as backup and recovery, making it a comprehensive Windows software solution.
Clone to removable drives: Enjoy the flexibility of cloning to removable hard drives by placing your SSD into a removable hard drive case before initiating the cloning process.
UEFI and BIOS support: Regardless of your system’s firmware, AOMEI Partition Assistant caters to both UEFI and BIOS environments.
User-friendly interface: Experience a simple and intuitive user interface that makes the entire process hassle-free.
Make the smart choice today and let EaseUS Todo Backup simplify your Windows 10 migration or cloning journey.
Step-by-Step Guide to transfer OS from HDD to SSD

With all preparations in place, you’re now ready to embark on the migration process. Follow the step-by-step guide on how to migrate Windows 10 to SSD.
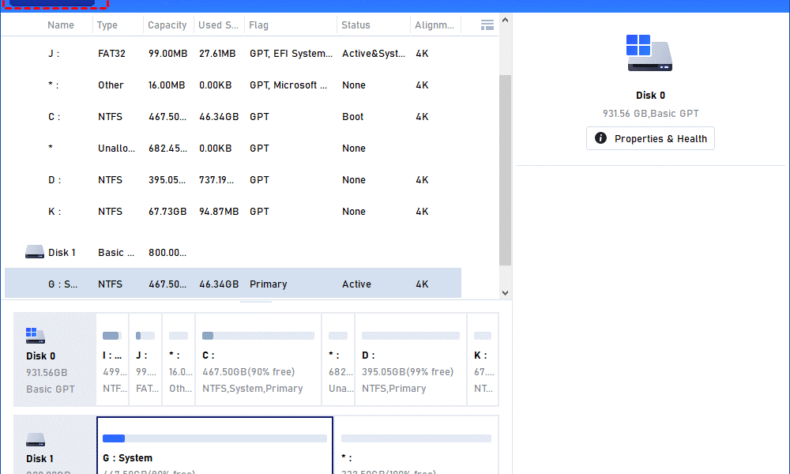
Step 1. Connect the SSD to your computer and ensure it can be detected; Install and launch AOMEI Partition Assistant Professional. Click the “Clone” > “Migrate OS”.
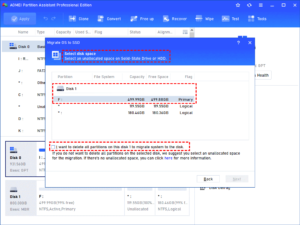
Step 2. Click “Next” to continue and choose an unallocated space on your SSD as the target location.
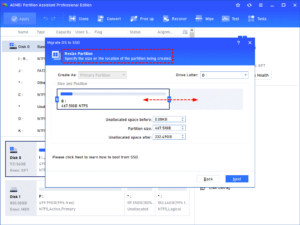
Step 3. In this window, you could resize partition and modify other information of the partition on new disk, of course, you can also keep default settings.
Step 4. After reading a note, you’ll be back to the main interface where you can see the pending operations and preview the result of operation. To commit it, please click “Apply” > “Proceed” to start to migrate Windows 10 to new hard drive.
Conclusion
It is a transformative process to migrate OS to SSD Windows 10, which can significantly enhance your computer’s performance and speed. When it comes to moving your Windows 10 to an SSD, choosing to migrate only the OS partition using AOMEI Partition Assistant Professional offers a higher level of reliability and boot success. This software provides a secure and seamless process, ensuring a smooth transition to your new SSD.